
Proudly Serving the States of Florida and Texas
.svg)
%204.svg)
Over 3,500 sinks installed
Contact Us
Thank you! Your submission has been received!
Oops! Something went wrong while submitting the form.
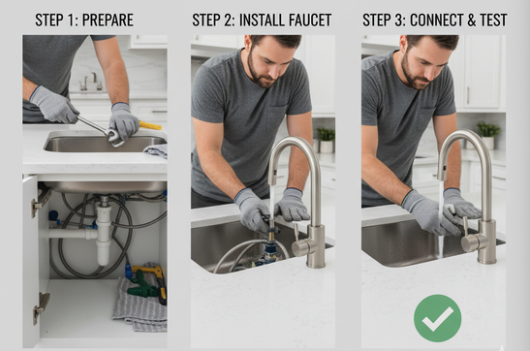
Installing a new faucet is one of the easiest and most satisfying upgrades you can make in your kitchen. Whether your old faucet is leaking, outdated, or just doesn’t fit your new sink, this simple project can be done in an afternoon—with the right tools and a little patience. Follow our step-by-step guide to make your DIY faucet installation smooth, leak-free, and professional-looking.
Before you do anything, shut off the water supply valves under the sink. Turn the handles clockwise until they stop, then open your faucet to release any remaining pressure. If you don’t see shut-off valves, turn off the main water line to your home to avoid unwanted surprises.
Using a wrench or basin wrench, loosen the nuts securing the old faucet to the sink. Disconnect the water supply lines carefully, keeping a towel or small bucket underneath to catch any leftover water. Once the nuts are off, lift out the old faucet and clean the surface of the sink to remove any old putty or residue.
Check the manufacturer’s instructions before proceeding—each faucet model is slightly different. Feed the faucet’s supply lines through the mounting holes on your sink or countertop. If your faucet requires a deck plate (to cover extra holes), install it now for a secure, even fit.
From underneath the sink, attach the mounting nuts and washers to the faucet’s threaded connections. Tighten them gently with a wrench—don’t overtighten, as this can damage your sink or faucet base. Make sure the faucet is straight and stable before fully securing it.
Attach the hot and cold water supply lines to the corresponding shut-off valves. Use plumber’s tape on the threads for a watertight seal, then tighten the connections. If your faucet includes a pull-down sprayer, connect the hose weight and clip it into place.
Turn the water supply back on slowly and check for leaks at every connection. Run the faucet on both hot and cold settings to flush out any air or debris. If you spot a small drip, tighten the fitting slightly or reapply plumber’s tape.
Wipe down the faucet and surrounding area to remove fingerprints and residue. Check that the faucet moves smoothly, the sprayer retracts correctly, and there’s no wobbling or noise. Congratulations—you just installed your new kitchen faucet!
At I Hate My Sink, we love helping homeowners take pride in their kitchen upgrades. A DIY faucet installation is a great first step toward improving both the look and functionality of your sink. But if you ever feel unsure, our team is just a call away to make sure your setup is flawless from top to bottom.
.png)
